The XYZPrinting Da Vinci is a new printer that is priced at $500 – quite a reasonable price, if you ask us. However, as expected for a printer that is priced so reasonably, there had to be some glitches.
It is delivered with a limited 300g Filament cartridge that isn’t exactly enough of material to be used for printing. What creates more problems is the fact that the filament that comes with this printer has some diameter inaccuracies that show up on the surface of the printed models in the form of small blobs.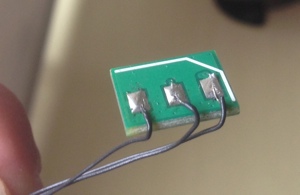
The fix? Make use of ExcelFil ABS with this printer. What was the issue in this fix? The Filament cartridge is protected electronically and carries out communication with the printer for letting it know that how much filament is left on the spool.
Once you open the cartridge, you’ll find a small PCB located at the bottom of it. It features three connectors that are employed for communication with the printer itself. Once you take a closer look, you’ll notice that the tiny PCB has a Microchip 11LC010 1K EEPROM at its center. This particular EEPROM has a memory capacity of 128 bytes that store information pertaining to the filament cartridge.
The three connectors are as following (left to right on the picture above):
1 = GND
2 = SCIO
3 = VCC</pre>
The SCIO pin features a UNI/O protocol and the chip is maintained via 8-bit instruction register.
A small Arduino Sketch that resets the counter to 999m was created. GND(1) and VCC(3) on the Da Vinci Filament EEPROM connects to GND and +5V on the Arduino and the SCIO(2) is connected to the Digital Out Pin 7 on the Arduino. The sketch runs the UNI/O protocol for reading and writing the EEPROM contents.
So, how do you restore the filament counter to 999m left? These are the contents of the EEPROM and you can see at byte offset 53 a 4 Byte long HEX value in little endian format. This represents the remaining filament length that is communicated to the printer. By setting this value to 0x34f420f00, you can restore the filament counter to 999m left.
00: 5A41570000343141C0D40100C0D40100 ZAW..41A……..
10: D2005A00544847423031313500000000 ..Z.THGB0115….
20: 000000003400000001010101AA55AA55 ….4……..U.U
30: 883355AA3F420f00D04407202FAE0A00 .3U……D. /…
40: 5A41570000343141C0D40100C0D40100 ZAW..41A……..
50: D2005A00544847423031313500000000 ..Z.THGB0115….
60: 000000003400000001010101AA55AA55 ….4……..U.U
70: 883355AAC0D40100AA55AA5507830A00 .3U……U.U….
Once the sketch starts, the LED on Arduino will blink rapidly and after you’ve made the connections as stated earlier, the LED will remain solid for about 2 seconds thus indicating that the EEPROM has been reset successfully.
The following code has been updated to work with the new firmware version 1.1.I.
Arduino Sketch – Just copy and paste into the Arduino IDE and upload to your Arduino of choice.
